| |||||||||||||||||||||||||||||
Thursday, April 30, 2020
Vinton Memories & History and 7 others are new Group suggestions for you


Wednesday, April 29, 2020
information about email marketing
Good morning
My name is Fabián Torre and I´m a EmailMarketing technician
I would like to know if you are interested in receiving
information about products and services of EmailMarketing, and to
what email address I can send it.
Thanks a lot
Whatsapp: +55 719 9313-1792
Skype: chronskype
My name is Fabián Torre and I´m a EmailMarketing technician
I would like to know if you are interested in receiving
information about products and services of EmailMarketing, and to
what email address I can send it.
Thanks a lot
Whatsapp: +55 719 9313-1792
Skype: chronskype
Tuesday, April 28, 2020
🔗 Suzi Vernon shared a link
| |||||||||||||||||||||||||||||||||||||||||||||

Sunday, April 26, 2020
ISPY: Exploiting EternalBlue And BlueKeep Vulnerabilities With Metasploit Easier

About ISPY:
ISPY is a Eternalblue (MS17-010) and BlueKeep (CVE-2019-0708) scanner and exploiter with Metasploit Framework.
ISPY was tested on: Kali Linux and Parrot Security OS 4.7.
ISPY's Installation:
For Arch Linux users, you must install Metasploit Framework and
curl first:pacman -S metasploit curlFor other Linux distros not Kali Linux or Parrot Security OS. Open your Terminal and enter these commands to install Metasploit Framework:
Then, enter these commands to install ISPY:
How to use ISPY?
ISPY's screenshots:


About the author:
- On Github: @Cyb0r9
- On Youtube: Cyborg
- On Ask Fm: Cyborg
- Email: TunisianEagles@protonmail.com
Disclaimer: Usage of ispy for attacking targets without prior mutual consent is illegal.
ispy is for security testing purposes only
More articles
Saturday, April 25, 2020
Gridcoin - The Bad
In this post we will show why Gridcoin is insecure and probably will never achieve better security. Therefore, we are going to explain two critical implementation vulnerabilities and our experience with the core developer in the process of the responsible disclosure.
Update (15.08.2017):
After the talk at WOOT'17 serveral other developers of Gridcoin quickly reached out to us and told us that there was a change in responsibility internally in the Gridcoin-Dev team. Thus, we are going to wait for their response and then change this blog post accordingly. So stay tuned :)
Update (16.08.2017):
We are currently in touch with the whole dev team of Gridcoin and it seems that they are going to fix the vulnerabilities with the next release.
TL;DR
The whole Gridcoin currency is seriously insecure against attacks and should not be trusted anymore; unless some developers are in place, which have a profound background in protocol and application security.
What is Gridcoin?
Gridcoin is an altcoin, which is in active development since 2013. It claims to provide a high sustainability, as it has very low energy requirements in comparison to Bitcoin. It rewards users for contributing computation power to scientific projects, published on the BOINC project platform. Although Gridcoin is not as widespread as Bitcoin, its draft is very appealing as it attempts to eliminate Bitcoin's core problems. It possesses a market capitalization of $13,530,738 as of August the 4th 2017 and its users contributed approximately 5% of the total scientific BOINC work done before October 2016.A detailed description of the Gridcoin architecture and technical terms used in this blog post are explained in our last blog post.
The Issues
Currently there are 2 implementation vulnerabilities in the source code, and we can mount the following attacks against Gridcoin:
- We can steal the block creation reward from many Gridcoin minters
- We can efficiently prevent many Gridcoin minters from claiming their block creation reward (DoS attack)
Because we already fixed a critical design issue in Gridcoin last year and tried to help them to fix the new issues. Unfortunately, they do not seem to have an interest in securing Gridcoin and thus leave us no other choice than fully disclosing the findings.
In order to explain the vulnerabilities we will take a look at the current Gridcoin source code (version 3.5.9.8).
WARNING: Due to the high number of source code lines in the source files, it can take a while until your browser shows the right line.
Stealing the BOINC block reward
The developer implemented our countermeasures in order to prevent our attack from the last blog post. Unfortunately, they did not look at their implementation from an attacker's perspective. Otherwise, they would have found out that they conduct not check, if the signature over the last block hash really is done over the last block hash. But we come to that in a minute. First lets take a look at the code flow: |
| In the figure the called-by-graph can be seen for the function VerifyCPIDSignature. |
- CheckBlock → DeserializeBoincBlock [Source]
- Here we deserialize the BOINC data structure from the first transaction
- CheckBlock → IsCPIDValidv2 [Source]
- Then we call a function to verify the CPID used in the block. Due to the massive changes over the last years, there are 3 possible verify functions. We are interested in the last one (VerifyCPIDSignature), for the reason that it is the current verification function.
- IsCPIDValidv2 → VerifyCPIDSignature [Source]
- VerifyCPIDSignature → CheckMessageSignature [Source, Source]
In the last function the real signature verification is conducted [Source]. When we closely take a look at the function parameter, we see the message (std::string sMsg) and the signature (std::string sSig) variables, which are checked. But where does this values come from?
If we go backwards in the function call graph we see that in VerifyCPIDSignature the sMsg is the string sConcatMessage, which is a concatenation of the sCPID and the sBlockHash.
We are interested where the sBlockHash value comes from, due to the fact that this one is the only changing value in the signature generation.
When we go backwards, we see that the value originate from the deserialization of the BOINC structure (MiningCPID& mc) and is the variable mc.lastblockhash [Source, Source]. But wait a second, is this value ever checked whether it contains the real last block hash?
No, it is not....
So they just look if the stored values there end up in a valid signature.
Thus, we just need to wait for one valid block from a researcher and copy the signature, the last block hash value, the CPID and adjust every other dynamic value, like the RAC. Consequently, we are able to claim the reward of other BOINC users. This simple bug allows us again to steal the reward of every Gridcoin researcher, like there was never a countermeasure.
Lock out Gridcoin researcher
The following vulnerability allows an attacker under specific circumstances to register a key pair for a CPID, even if the CPID was previously tied to another key pair. Thus, the attacker locks out a legit researcher and prevent him from claiming BOINC reward in his minted blocks.
Reminder: A beacon is valid for 5 months, afterwards a new beacon must be sent with the same public key and CPID.
Therefore, we need to take a look at the functions, which process the beacon information. Every time there is a block, which contains beacon information, it is processed the following way (click image for higher resolution):
In the figure the called-by-graph can be seen for the function GetBeaconPublicKey. |
- ProcessBlock → CheckBlock [Source]
- CheckBlock → LoadAdminMessages [Source]
- LoadAdminMessages → MemorizeMessages [Source]
- MemorizeMessages → GetBeaconPublicKey [Source]
For the following explanation we assume that we have an existing association (bound) between a CPID A and a public key pubK_A for 4 months.
- First public key for a CPID received [Source]
- The initial situation, when pubK_A was sent and bind to CPID A (4 months ago)
- Existing public key for a CPID was sent [Source]
- The case that pubK_A was resent for a CPID A, before the 5 months are passed by
- Other public key for a CPID was sent [Source]
- The case, if a different public key pubK_B for the CPID A was sent via beacon.
- The existing public key for the CPID is expired
- After 5 months a refresh for the association between A and pubK_A is required.
When an incoming beacon is processed, a look up is made, if there already exists a public key for the CPID used in the beacon. If yes, it is compared to the public key used in the beacon (case 2 and 3).
If no public key exists (case 1) the new public key is bound to the CPID.
If a public key exists, but it was not refreshed directly 12.960.000 seconds (5 months [Source]) after the last beacon advertisement of the public key and CPID, it is handled as no public key would exist [Source].
Thus, case 1 and 4 are treated identical, if the public key is expired, allowing an attacker to register his public key for an arbitrary CPID with expired public key. In practice this allows an attacker to lock out a Gridcoin user from the minting process of new blocks and further allows the attacker to claim reward for BOINC work he never did.
There is a countermeasure, which allows a user to delete his last beacon (identified by the CPID) . Therefore, the user sends 1 GRC to a special address (SAuJGrxn724SVmpYNxb8gsi3tDgnFhTES9) from an GRC address associated to this CPID [Source]. We did not look into this mechanism in more detail, because it only can be used to remove our attack beacon, but does not prevent the attack.
The responsible disclosure process
As part of our work as researchers we all have had the pleasure to responsible disclose the findings to developer or companies.For the reasons that we wanted to give the developer some time to fix the design vulnerabilities, described in the last blog post, we did not issue a ticket at the Gridcoin Github project. Instead we contacted the developer at September the 14th 2016 via email and got a response one day later (2016/09/15). They proposed a variation of our countermeasure and dropped the signature in the advertising beacon, which would result in further security issues. We sent another email (2016/09/15) explained to them, why it is not wise to change our countermeasures and drop the signature in the advertising beacon.
Unfortunately, we did not receive a response. We tried it again on October the 31th 2016. They again did not respond, but we saw in the source code that they made some promising changes. Due to some other projects we did not look into the code until May 2017. At this point we found the two implementation vulnerabilities. We contacted the developer twice via email (5th and 16th of May 2017) again, but never received a response. Thus, we decided to wait for the WOOT notification to pass by and then fully disclose the findings. We thus have no other choice then to say that:
The whole Gridcoin cryptocurrency is seriously insecure against attacks and should not be trusted anymore; unless some developers are in place, which have a profound background in protocol and application security.
Further Reading
A more detailed description of the Gridcoin architecture, the old design issue and the fix will be presented at WOOT'17. Some days after the conference the paper will be available online.
Read more
Friday, April 24, 2020
🔔 See Lois Joseph Miller's message and other notifications you've missed
| ||||||||||||||||||||||||||||||||||||||||||||||||||||||||||||||||||||||||||||||


Thursday, April 23, 2020
Recovering Data From An Old Encrypted Time Machine Backup
Recovering data from a backup should be an easy thing to do. At least this is what you expect. Yesterday I had a problem which should have been easy to solve, but it was not. I hope this blog post can help others who face the same problem.

2. This backup was not on an official Apple Time Capsule or on a USB HDD, but on a WD MyCloud NAS
3. I needed files from this backup
4. After running out of time I only had SSH access to the macOS, no GUI
As always, I started to Google what shall I do. One of the first options recommended that I add the backup disk to Time Machine, and it will automagically show the backup snapshots from the old backup. Instead of this, it did not show the old snapshots but started to create a new backup. Panic button has been pressed, backup canceled, back to Google.
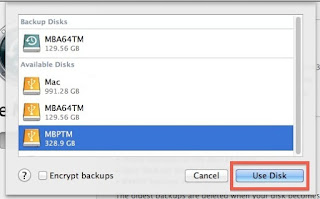
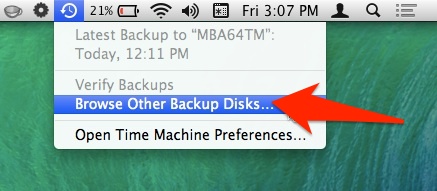
Other tutorials recommend to click on the Time Machine icon and pressing alt (Option) key, where I can choose "Browse other backup disks". But this did not list the old Time Machine backup. It did list the backup when selecting disks in Time Machine preferences, but I already tried and failed that way.

YAT (yet another tutorial) recommended to SSH into the NAS, and browse the backup disk, as it is just a simple directory where I can see all the files. But all the files inside where just a bunch of nonsense, no real directory structure.
YAT (yet another tutorial) recommended that I can just easily browse the content of the backup from the Finder by double-clicking on the sparse bundle file. After clicking on it, I can see the disk image on the left part of the Finder, attached as a new disk.
Well, this is true, but because of some bug, when you connect to the Time Capsule, you don't see the sparse bundle file. And I got inconsistent results, for the WD NAS, double-clicking on the sparse bundle did nothing. For the Time Capsule, it did work.
At this point, I had to leave the location where the backup was present, and I only had remote SSH access. You know, if you can't solve a problem, let's complicate things by restrict yourself in solutions.
Finally, I tried to check out some data forensics blogs, and besides some expensive tools, I could find the solution.
The best part of hdiutil is that you can provide the read-only flag to it. This can be very awesome when it comes to forensics acquisition.

To mount any NAS via SMB:
To mount a Time Capsule share via AFP:
And finally this command should do the job:
It is nice that you can provide read-only parameter.
If the backup was encrypted and you don't want to provide the password in a password prompt, use the following:
Note: if you receive the error "resource temporarily unavailable", probably another machine is backing up to the device
And now, you can find your backup disk under /Volumes. Happy restoring!
Probably it would have been quicker to either enable the remote GUI, or to physically travel to the system and login locally, but that would spoil the fun.

The problem
1. I had an encrypted Time Machine backup which was not used for months2. This backup was not on an official Apple Time Capsule or on a USB HDD, but on a WD MyCloud NAS
3. I needed files from this backup
4. After running out of time I only had SSH access to the macOS, no GUI
The struggle
By default, Time Machine is one of the best and easiest backup solution I have seen. As long as you stick to the default use case, where you have one active backup disk, life is pink and happy. But this was not my case.As always, I started to Google what shall I do. One of the first options recommended that I add the backup disk to Time Machine, and it will automagically show the backup snapshots from the old backup. Instead of this, it did not show the old snapshots but started to create a new backup. Panic button has been pressed, backup canceled, back to Google.

Other tutorials recommend to click on the Time Machine icon and pressing alt (Option) key, where I can choose "Browse other backup disks". But this did not list the old Time Machine backup. It did list the backup when selecting disks in Time Machine preferences, but I already tried and failed that way.
YAT (yet another tutorial) recommended to SSH into the NAS, and browse the backup disk, as it is just a simple directory where I can see all the files. But all the files inside where just a bunch of nonsense, no real directory structure.
YAT (yet another tutorial) recommended that I can just easily browse the content of the backup from the Finder by double-clicking on the sparse bundle file. After clicking on it, I can see the disk image on the left part of the Finder, attached as a new disk.
Well, this is true, but because of some bug, when you connect to the Time Capsule, you don't see the sparse bundle file. And I got inconsistent results, for the WD NAS, double-clicking on the sparse bundle did nothing. For the Time Capsule, it did work.
At this point, I had to leave the location where the backup was present, and I only had remote SSH access. You know, if you can't solve a problem, let's complicate things by restrict yourself in solutions.
Finally, I tried to check out some data forensics blogs, and besides some expensive tools, I could find the solution.
The solution
Finally, a blog post provided the real solution - hdiutil.The best part of hdiutil is that you can provide the read-only flag to it. This can be very awesome when it comes to forensics acquisition.

To mount any NAS via SMB:
mount_smbfs afp://<username>@<NAS_IP>/<Share_for_backup> /<mountpoint>
To mount a Time Capsule share via AFP:
mount_afp afp://any_username:password@<Time_Capsule_IP>/<Share_for_backup> /<mountpoint>
And finally this command should do the job:
hdiutil attach test.sparsebundle -readonly
It is nice that you can provide read-only parameter.
If the backup was encrypted and you don't want to provide the password in a password prompt, use the following:
printf '%s' 'CorrectHorseBatteryStaple' | hdiutil attach test.sparsebundle -stdinpass -readonly
Note: if you receive the error "resource temporarily unavailable", probably another machine is backing up to the device
And now, you can find your backup disk under /Volumes. Happy restoring!
Probably it would have been quicker to either enable the remote GUI, or to physically travel to the system and login locally, but that would spoil the fun.
Related articles
How To Start | How To Become An Ethical Hacker
Are you tired of reading endless news stories about ethical hacking and not really knowing what that means? Let's change that!
This Post is for the people that:
- Have No Experience With Cybersecurity (Ethical Hacking)
- Have Limited Experience.
- Those That Just Can't Get A Break

OK, let's dive into the post and suggest some ways that you can get ahead in Cybersecurity.
I receive many messages on how to become a hacker. "I'm a beginner in hacking, how should I start?" or "I want to be able to hack my friend's Facebook account" are some of the more frequent queries. Hacking is a skill. And you must remember that if you want to learn hacking solely for the fun of hacking into your friend's Facebook account or email, things will not work out for you. You should decide to learn hacking because of your fascination for technology and your desire to be an expert in computer systems. Its time to change the color of your hat 😀
I've had my good share of Hats. Black, white or sometimes a blackish shade of grey. The darker it gets, the more fun you have.
If you have no experience don't worry. We ALL had to start somewhere, and we ALL needed help to get where we are today. No one is an island and no one is born with all the necessary skills. Period.OK, so you have zero experience and limited skills…my advice in this instance is that you teach yourself some absolute fundamentals.
Let's get this party started.
- What is hacking?
Hacking is identifying weakness and vulnerabilities of some system and gaining access with it.
Hacker gets unauthorized access by targeting system while ethical hacker have an official permission in a lawful and legitimate manner to assess the security posture of a target system(s)There's some types of hackers, a bit of "terminology".
White hat — ethical hacker.
Black hat — classical hacker, get unauthorized access.
Grey hat — person who gets unauthorized access but reveals the weaknesses to the company.
Script kiddie — person with no technical skills just used pre-made tools.
Hacktivist — person who hacks for some idea and leaves some messages. For example strike against copyright.
- Skills required to become ethical hacker.
- Curosity anf exploration
- Operating System
- Fundamentals of Networking
Related news
Theharvester: Email Harvesting Throughout Year

You might have harvested many things upto now but what we are going to harvest today is something bad :)
Requirements:
- A Linux box (I'm using Kali Linux)
- theharvester program (already available in Kali Linux)
OK stop talking and start doing.
Fire up a terminal in your kali box and type this command:
theharvester -d hotmail.com -l 50 -b google
In a small amount of time you'll see your terminal flooded with 200 hotmail.com email address. What does this command mean?

theharvester is the tool name that we are using
-d <domain_name> specifies the domain (or website) who's email addresses we're looking for, in our case it was hotmail.com
-l <number> specifies the number of results that we want in the output, I limited it to 50
-b <source> specifies the source on which to look for email addresses, I specified google as the source
Besides google we can specify any of the follow as source:
google, googleCSE, bing, bingapi, pgp, linkedin, google-profiles, people123, jigsaw, twitter, googleplus, all
Here the last entry all means look in every available source.
Let's say you wanted to look in every available source they you should specify the following command:
theharvester -d hotmail.com -b all

-f is another great flag which can be utilized to save the output in case we want to SPAM them later (just kidding) or for other reasons (I'm thinking positive). -f flag saves the result in html or xml format. Let's do just that:
theharvester -d gmail.com -l 50 -b google -f emailaddresses.html
here -f flag is followed by the location where we want to store the file and the name of file, in our case we stored it in our pwd (present working directory) with the name emailaddresses.html.

Above picture shows an html output generated by harvester.
That's it for this tutorial hope to see you next time!
Related posts
Subscribe to:
Posts (Atom)